
The Last V8 Interceptor
I've got something special in this post, the latest in a series of articles about toy cars used for 28mm post-apocalyptic sci-fi gaming.
I present my interpretation of one of the most iconic post-apocalyptic automobiles. Mentioned in a passing reference in "The Road Warrior" as "the last of the V8 interceptors" Mad Max's Interceptor should be an irresistible temptation for post-apoc gamers.
The car existed in two different states. In "Mad Max," it was a souped-up muscle car. In "The Road Warrior," it was a a dusty, banged-up post-apocalyptic survival vehicle.
My version attempts to capture the spirit of the car featured in "The Road Warror."

Here's some more info about the vehicle that became the Interceptor in the film. The filmmakers started with the Australian-made Ford Falcon XB.
As it's not currently available as a cheap 1/43 toy, I had to make do with whatever I could find at America's Best, Train Toy and Hobby Shop here in suburban Chicago. The store always has a great selection of cheap 1/43 toy cars. The closest thing I could find was a 1967 Camaro from the Road Signature line.

Besides the general muscle car shape and overall dirtiness, I noted six major features of the Road Warrior Interceptor.
- Concorde after-market nose — In "The Road Warrior," the bottom half of the nose is missing. It was complete in "Mad Max", but the top half is still present.
- Hood mounted blower
- Large exposed gas tanks in trunk that necessitated the cutaway of the trunk and part of the rear cabin, including the rear spoiler.
- Roof spoiler
- Small exhaust pipes coming up the sides just behind the doors
- Extended guards around the wheel wells
I decided that with the Camaro, I could replicate steps 1 through 4 and disregard 5 and 6 while still keeping the spirit of the vehicle.
I first disassembled the Camaro and was delighted to see the shape of the lower section of the bumper. This would become the basis for the Concorde nose. This discovery alone is enough to make me recommend this specific toy

After a bit of trimming, the lower bumper section was inverted and glued to the front. I saved the stock grill for future modeling projects. Squadron White putty was used to fill the gaps. I highly recommend this product for fast filling (dries in 30 minutes!) and ease of sanding.
I then used the cutting blade on my Dremel to remove the trunk and rear spoiler, being careful to remove the spoiler in one piece so that it could be reattached to the roof. I also sanded the paint off the area where the spoiler would be glued.
The Dremel and a diamond file made quick work of sizing and shaping the spoiler to fit the roof. The back seats were also cut away.

Unfortunately the gear and stowage I added behind the seat would end up virtually invisible when reassembled. The gas tanks are two halves of a Warhammer 40k barrel.

The blower was assembled from random bits. After assembly, the vehicle was primed with black gesso.

Painting was fairly simple.
Here are the steps I used
- Drybrush brown with some heavier application around the wheels
- A wet drybrush of rust red here and there, and silver on the blower and gas tanks
- Drybrush of dusty tan all over
- Seal with brush-on matte varnish
The windows were then put back in and the car was reassembled and glued back together. The windows received a drybrush of dusty tan which brings us to today's
Easy Tip!
Using your thumb, draw an arc across a windshield that has just been drybrushed with tan to give the effect of windshield wipers.
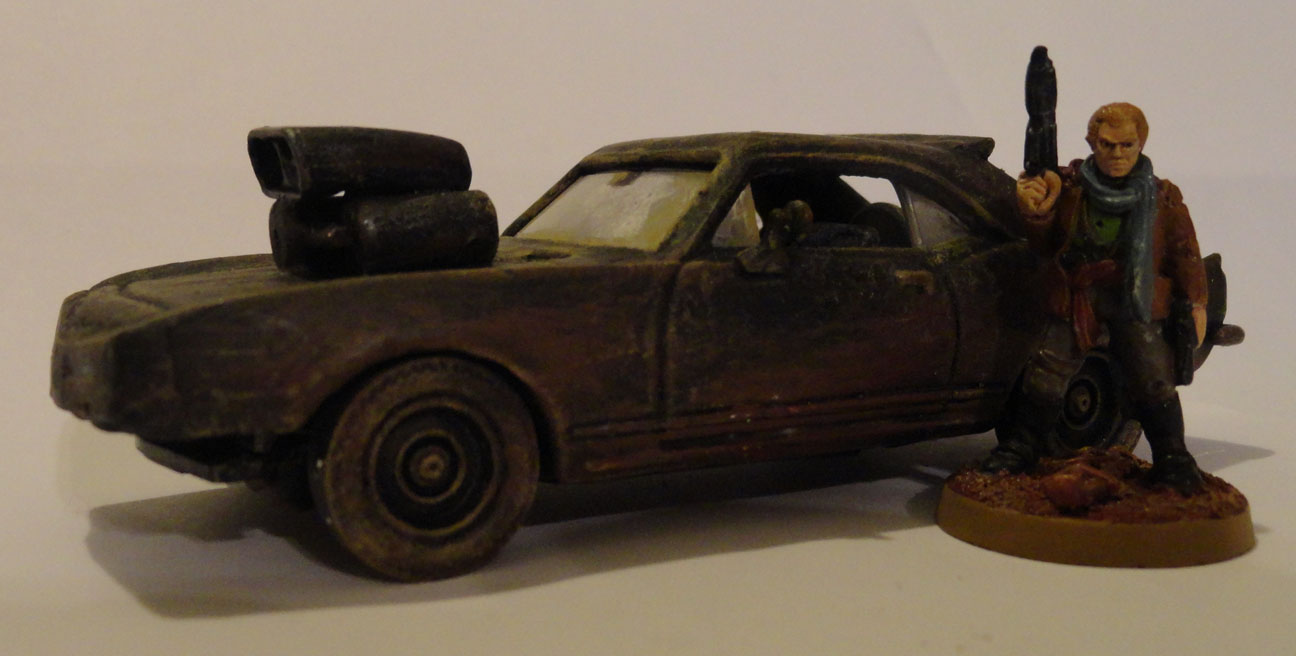
Here are the results; this car will be a great addition to the post-apocalyptic chase game we are running at the Little Wars game convention next week.


I'm very happy with the results. In retrospect, the blower intake is ridiculously huge, but it's all in good fun and doesn't ruin the look.
While doing the Interceptor, I also made two more cars. In order to be usable in modern and post-apoc settings, I made them dusty and worn, but not totally post-apocified.
The Toyota Land Cruiser came with a large plastic suspension screwed to the bottom and monster truck wheels. The suspension was removed and replaced with a set of smaller wheels. I used a can of cheap red spray paint to cover up the silly paint job before drybrushing it to achieve a weathered look.

The Crown Victoria Police Interceptor is another nice car from Kinsmart and is widely available online and in stores.

Here's my standard formula to quickly paint toy cars to make them look more appropriate for the gaming table:
- Brush on Matte varnish to cut the shine and make the later steps adhere better
- Drybrush dusty tan all over the body
- Very light drybrush of dusty tan over the windows and wipe the front window with a finger to create a windshield-wiper effect
- Brush on another layer of matte varnish
Here's a photo showing all three cars together. The scales are not entirely correct (all had 1/42 or 1/43 stamped on them) as the Crown Vic and Toyota are notably larger than the Interceptor, but the difference shouldn't look bad on the table.

Lastly, here are my two Mad Max figures: the EM-4 Road Warrior (formerly produced by Grenadier) and a recently acquired Reaper Chronoscope figure called Rex, Dark Future Hero.
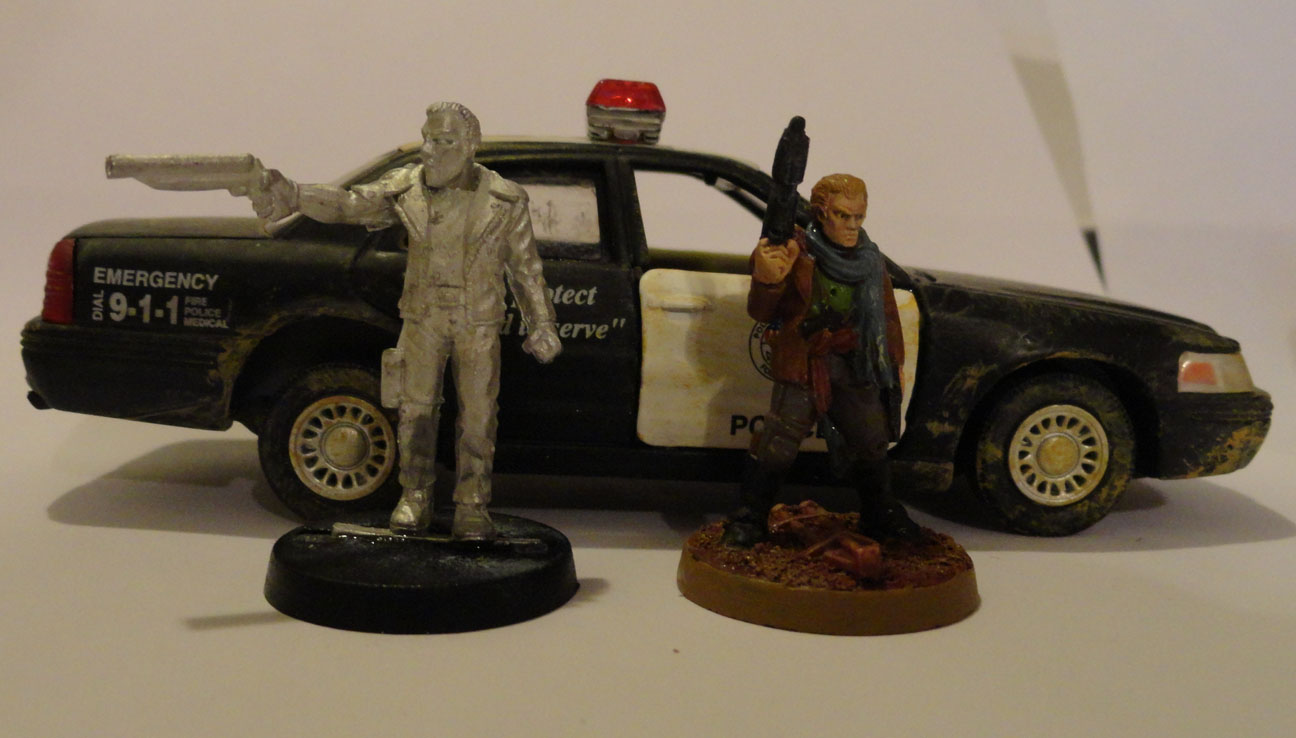
Both are good representations of Mad Max, with Rex being from "Mad Max" and EM4's Road Warrior representing Max from the end of "The Road Warror" and "Mad Max Beyond Thunderdome." But as you can see, the difference in size is huge. Using sole-to-eye measurements, Road Warrior is 28mm, while Rex is nearly 34mm!
Despite being a great figure, Rex is by far the tallest post-apocalyptic figure I own, and it has kept me from painting him, though now that I have an Interceptor I'll probably paint him up anyway.
I would like to know what the heck Reaper was thinking, though, in making Rex so much taller than the other brands of figures he would likely be matched with.
There you have it, a few more cars to populate the grim darkness of the near future. As always questions are welcomed and comments appreciated.
— Karl, Chicago Skirmish Wargames club member
Jay says:
Great work! You get the major award for creativeness and finished product…IMHO.
Sean says:
Fantastic interpretation of Max's car and a nice tutorial. Look forward to seeing it in a batrep.
The Mad Robot says:
Awesome custom work! It truly looks like the last of the V8's!
feed_Audrey says:
I know, I am a few years behind, but I wanted to let you know that this article finally convinced me to try my own hand at a Mad Max-style skirmish. Thanks for the great car!